Multiple WordPress sites have some way to set up themselves, there is a simple way that you can set up multiple WordPress sites without tricky Multisite network in this post.
Of course, your environment need only one Apache and one DB(MySQL).
Bitnami is one of the best solution in this case than XAMPP. It is free, easy, and smart.

Although this post will set up mutiple WordPress sites into your local Windows 7 computer as a test environment, it will help you when build a second Bitnami WordPress site on your server. In that case, first site does not be affected. Beautiful Bitnami.
Also, when you are going to create a brand-new WordPress site, Bitnami will be good choice I think.
Let’s start.
CAUTION:
Please take the backup of files before each operating.
Our Goal
As a result of this post, you become able to access each WordPress site in the following URLs.
- http://mydomain.1st/
- http://mydomain.2nd/
The domain name is arbitrary. You can replace your own domain name instead of it.
Index of Steps
- Download Bitnami
- Setup and Instllation for 1st WordPress Site
- Change the default URL to Root for 1st WordPress Site
- Setup and Instllation for 2nd WordPress Site
- Edit hosts file
- Edit configuration files for Bitnami
- Restart Apache
It is easy.
Download Bitnami
At first, download a package of Bitnami WordPress Stack.
Please download an installer from the following page.
- https://bitnami.com/stack/wordpress
- File name:
bitnami-wordpress-(version)-windows-installer.exe
Download one more different installer for setting up 2nd site.
- https://bitnami.com/stack/wamp/modules
- File name:
bitnami-wordpress-(version)–module-windows-installer.exe
Setup and Instllation for 1st WordPress Site
Double click the installer you just downloaded (bitnami-wordpress-(version)-windows-installer.exe) to launch the installer.
Please proceed in accordance with the installer.
If you need more help, refer to the following page.
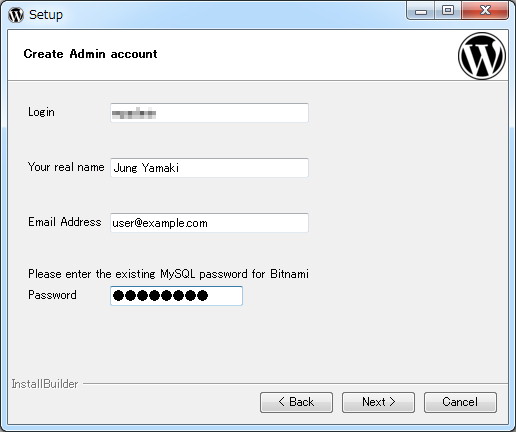
Create Admin account
CAUTION:
Don’t forget your admin account and password in this step.
File Copy
When installation is complete, please copy the file which you secondly downloaded to installation folder of Bitnami for following steps.
- File name:
bitnami-wordpress-(version)–module-windows-installer.exe - Copy to:
D:\Bitnami\wordpress-3.9.1-1 (this is an example)
Change the default URL to Root for 1st WordPress Site
Bitnami sets up your WordPress site as “http://…/wordpress/“, then remove the “wordpress/” prefix from the URL.
You can open the “Use BitNami WordPress Stack” command prompt from Windows shortcuts and run the following command:
> cd apps\wordpress
> bnconfig.exe --base_directory "D:\BitNami\wordpress-(version)" --appurl /
“D:\BitNami\wordpress-(version)” is an example, please input your Bitnami folder instead of it.
If an error is not displayed, it is completed normally.
Setup and Instllation for 2nd WordPress Site
Launch the installer which you secondly downloaded using command-line option.
Use the command prompt that opened in previous step.
Run the following command:
> cd ..\..
> bitnami-wordpress-(version)-module-windows-installer.exe --wordpress_instance_name wordpress2
Proceed in accordance with the installer, but it is slightly different from 1st site‘s installation.
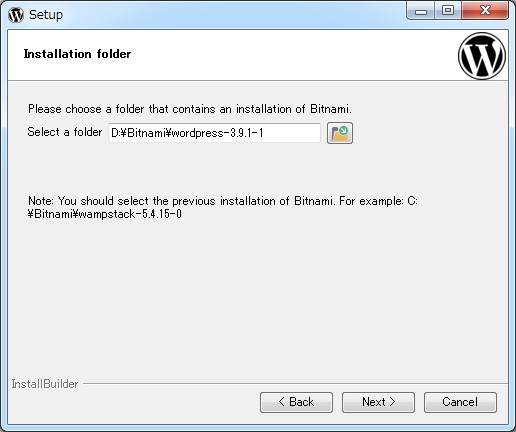
Installation folder
Select the Bitnami instllation folder, same as 1st site.

Create Admin account
- Login: Input WordPress admin account for 2nd site.
- Password: Input password same as 1st site.

Edit hosts file
Now, you can access your mutiple WordPress sites in the following URLs.
- 1st site: http://127.0.0.1/
- 2nd site: http://127.0.0.1/wordpress2/
Edit hosts file to approach the goal.
- Right click Notepad, and click “Run as administrator“
- Click “File” on menu bar, and click “Open”
- Open C:\Windows\System32\drivers\etc
(Copy and paste this path strings on folder box, it is quickly) - Choose “All Files” in file types of the window lower right
- Click “hosts” which appeared, and click “Open” button
Add the following code in end of file.
127.0.0.1       mydomain.1st
127.0.0.1       mydomain.2nd
When you are done, save file and close notepad.
Edit configuration files for Bitnami
Next, Edit configuration files for Bitnami.
Specifically, it will set the VirtualHost of Apache, but there are some manners in the case of Bitnami.
CAUTION:
Following described “D:\Bitnami\wordpress-3.9.1-1” is an example. Please replace it by the Bitnami installation folder of your environment.
Enable VirtualHost
Because default of Bitnami cannot use VirtualHost.
bitnami-apps-vhosts.conf
Please open the following file by your editor.
D:\Bitnami\wordpress-3.9.1-1\apache2\conf\bitnami\bitnami-apps-vhosts.confAdd the following code in end of file.
Include "D:/Bitnami/wordpress-3.9.1-1/apps/wordpress/conf/httpd-vhosts.conf"
Include "D:/Bitnami/wordpress-3.9.1-1/apps/wordpress2/conf/httpd-vhosts.conf"
bitnami-apps-prefix.conf
Please open the following file again.
D:\Bitnami\wordpress-3.9.1-1\apache2\conf\bitnami\bitnami-apps-prefix.confLeave the line of “phpmyadmin”, and comment out others.
# Bitnami applications installed in a prefix URL
# Include "D:/Bitnami/wordpress-3.9.1-1/apps/wordpress/conf/httpd-prefix.conf"
Include "D:/Bitnami/wordpress-3.9.1-1/apps/phpmyadmin/conf/httpd-prefix.conf"

# Include "D:/Bitnami/wordpress-3.9.1-1/apps/wordpress2/conf/httpd-prefix.conf"
Following steps are VirtualHost settings.
httpd-vhosts.conf (for 1st site)
Please open the following file again.
D:\Bitnami\wordpress-3.9.1-1\apps\wordpress\conf\httpd-vhosts.confEdit the lines as with following hilighted lines.
<VirtualHost mydomain.1st:80>
  ServerName mydomain.1st
  ServerAlias www.mydomain.1st
  DocumentRoot "D:\Bitnami\wordpress-3.9.1-1/apps/wordpress/htdocs"
  Include "D:\Bitnami\wordpress-3.9.1-1/apps/wordpress/conf/httpd-app.conf"
</VirtualHost>

<VirtualHost mydomain.1st:443>
  ServerName mydomain.1st
  ServerAlias www.mydomain.1st
  DocumentRoot "D:\Bitnami\wordpress-3.9.1-1/apps/wordpress/htdocs"
  SSLEngine on
  SSLCertificateFile "D:\Bitnami\wordpress-3.9.1-1/apps/wordpress/conf/certs/server.crt"
  SSLCertificateKeyFile "D:\Bitnami\wordpress-3.9.1-1/apps/wordpress/conf/certs/server.key"
  Include "D:\Bitnami\wordpress-3.9.1-1/apps/wordpress/conf/httpd-app.conf"
</VirtualHost>
httpd-vhosts.conf (for 2nd site)
Please open the following file again.
D:\Bitnami\wordpress-3.9.1-1\apps\wordpress2\conf\httpd-vhosts.confEdit the lines as with following hilighted lines.
<VirtualHost mydomain.2nd:80>
  ServerName mydomain.2nd
  ServerAlias www.mydomain.2nd
  DocumentRoot "D:/Bitnami/wordpress-3.9.1-1/apps/wordpress2/htdocs"
  Include "D:/Bitnami/wordpress-3.9.1-1/apps/wordpress2/conf/httpd-app.conf"
</VirtualHost>

<VirtualHost mydomain.2nd:443>
  ServerName mydomain.2nd
  ServerAlias www.mydomain.2nd
  DocumentRoot "D:/Bitnami/wordpress-3.9.1-1/apps/wordpress2/htdocs"
  SSLEngine on
  SSLCertificateFile "D:/Bitnami/wordpress-3.9.1-1/apps/wordpress2/conf/certs/server.crt"
  SSLCertificateKeyFile "D:/Bitnami/wordpress-3.9.1-1/apps/wordpress2/conf/certs/server.key"
  Include "D:/Bitnami/wordpress-3.9.1-1/apps/wordpress2/conf/httpd-app.conf"
</VirtualHost>
Change the default URL to Root for 2nd Site
httpd-app.conf (for 2nd site)
Please open the following file again.
D:\Bitnami\wordpress-3.9.1-1\apps\wordpress2\conf\httpd-app.confEdit the lines as with following hilighted lines.
<Directory "D:/Bitnami/wordpress-3.9.1-1/apps/wordpress2/htdocs">
    Options +MultiViews +FollowSymLinks
    AllowOverride None

    <IfVersion < 2.3 >
    Order allow,deny
    Allow from all
    </IfVersion>
    <IfVersion >= 2.3>
    Require all granted
    </IfVersion>

    RewriteEngine On
    #RewriteBase /wordpress2/
    RewriteRule ^index\.php$ - [S=1]
    RewriteCond %{REQUEST_FILENAME} !-f
    RewriteCond %{REQUEST_FILENAME} !-d
    RewriteRule . index.php [L]

</Directory>
- Line 14: Comment out of RewrightBase
- Line 18: Editing of RewrightRule
wp-config.php (for 2nd site)
Please open the following file again.
D:\Bitnami\wordpress-3.9.1-1\apps\wordpress2\htdocs\wp-config.phpEdit the lines beginning in “define(‘WP_SITEURL'” as with following code.
(Deleting “wordpress2” of end of line)
define('WP_SITEURL', 'http://' . $_SERVER['HTTP_HOST'] . '/');
define('WP_HOME', 'http://' . $_SERVER['HTTP_HOST'] . '/');
Configuration has just finished. Thank you!
Restart Apache
Restart Apache to reflect settings.
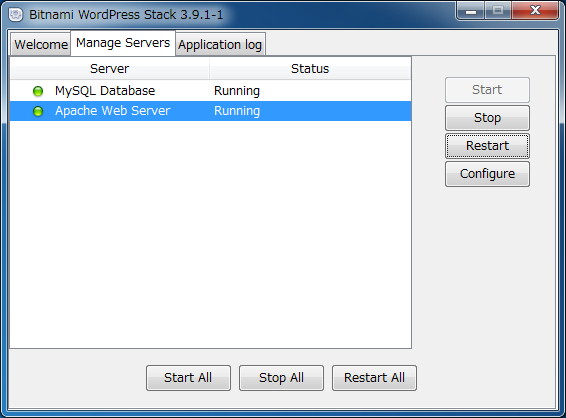
You can launch the “wordpress manager tool” from Windows shortcuts.

- Click “Mnage Servers” tab
- Click “Apache Web Server”
- Click “Restart” button
When Status returns to “Running”, it is finished.
It is Perfection!
Then, please try that you can access your WordPress sites with the following URLs.
In this way, you can add 3rd, 4th and more many sites as you like.
Rerated Site
Thank you for enduring my poor English.
Enjoy your WordPress.
Hi! I would like to really say thank you for this post!
Keep going on like this!
Thank you very much,
Emer.
Thanks.
this article helped me. It’s is no longer necessary to configure anything beyond the wordpress instance on the second installation. Everything is now done automatically during the install.
really helped. Thank you very much.
Thankyou so very much for great explanation!!! I cant tell u how much it has helped me.
God Bless :)
great tutorial. I want multiple WordPress installs with different database